Raise your hand if you believe creating a website is a difficult task!
Back to the time I first stepped into this industry, I had always kept this thought in mind that building a website would require a lot of knowledge and skills in HTML (code), CSS and even Flash.
However, when content management systems came to my knowledge, I was enlightened. Hence, if you did raise your hand to the sentence at the top, well, I’m here with my article “A Step-by-Step Guide: How to Set up a WordPress Website” to tell you the opposite: Building a website is not-so-hard a task any longer!
Before we get started, I wonder whether you thought to yourself “Why WordPress?” when looking at the title? If you did, here are some figures I prepared: With 1,149,956 domains in total, 48% of CMS’s tracked was WordPress in Jan-July 2015 (according to BuiltWith).
Convinced yet?
If you say “no”, well, just so you know, WordPress is totally free with a wide variety of layouts to choose from, super easy to install and use, mobile and tablet friendly.
Last but not least, using WordPress also means joining a community with millions of friends who are always willing to offer a hand to help when you need one (or many). Besides WordPress, such other choices as Drupal and Joomla are also popular. However, if you’re a newbie in this niche, I strongly believe you should opt for WordPress.
Now that you have registered yourself a website, simply follow the map I sketch out below to get it launched:
- Map out Your Site’s Content;
- Choose a Domain Name and Web Hosting;
- Install WordPress;
- Decide on a Theme/Template;
- Add Content/Create Pages;
- Customize Your Site;
- Installing Plugins;
- Create a Menu and Done!
Now, let’s get the party started, shall we?
1. Map out Your Site’s Content

The basic principle here is: Do not start anything unless you’re sure about it, or else it will lead you to nowhere. Setting up a website is no different. First, you have to sketch out the important components of your website and decide on which pages to include in it, or should I say, the content of it. I’m pretty sure we all realize how important the content is. It’s what draws the attention of visitors and also what keeps them around. Many people make the mistake of choosing the theme before mapping out the content, which results in the fact that the theme doesn’t match the content. Do not make that mistake!
Think about the scope! For example, let’s say you’re a writer and you want to launch a website, you may want to follow two critical steps:
- Decide on what you want and don’t want to include in your website, for example, maybe you want to share your travel diaries, food review, travel tips, etc., and don’t want to write about bad impressions on the places you’ve been to.
- Figure out the way you want to present it, for example, whether you will write text-heavy essay or simply show pictures with short captions under them, whether you want to use widgets and where to put them, whether you want a sidebar and which type, what general colors and styles you want for your website, etc.
That’s all for the first step, now let’s move on!
2. Choose a Domain Name and Web Hosting

To launch your website, you should get two things done:
- Choose a domain name (a web address like yourwebsite.com);
- Decide on your Hosting (a service connecting your website to the Internet).
Well, WordPress itself is free, but to have a domain name and hosting service, you have to pay around $3-$5 a month. Your website could totally be fine without these two, but having your own domain name would make your website look a lot more professional, and hosting would make it load a lot more quickly. So, weigh the pros and cons, then decide!
It’s up to you to choose a web hosting service and domain registrar, but speaking from my experience, I highly recommend these WordPress hosting companies.
Regarding your domain name, simply think up a domain name that reflects your business, or solely the purpose of your website. Then, contact the hosting service company you choose and go ahead with protecting your domain name and web hosting.
3. Install WordPress
There are two ways to install WordPress, as follows:
- One-Click-installation;
- Manual installation;
As most web hosting services have integrated the one-click-installation for WordPress, which makes it a lot easier, I’m just going to provide you with the guide for one-click-installation.
Once you’ve signed up with a hosting company, you should see your “one-click-installation” in your account control panel. The steps are:
- Log into your hosting account.
- Go to your control panel.
- Search around for the “WordPress” icon.
- Select the domain where you would like to install your website.
- Click the “Install Now” button and you should be brought to your new WordPress website.
The steps should be similar with all reliable web hosting services!
4. Decide on a Theme/Template
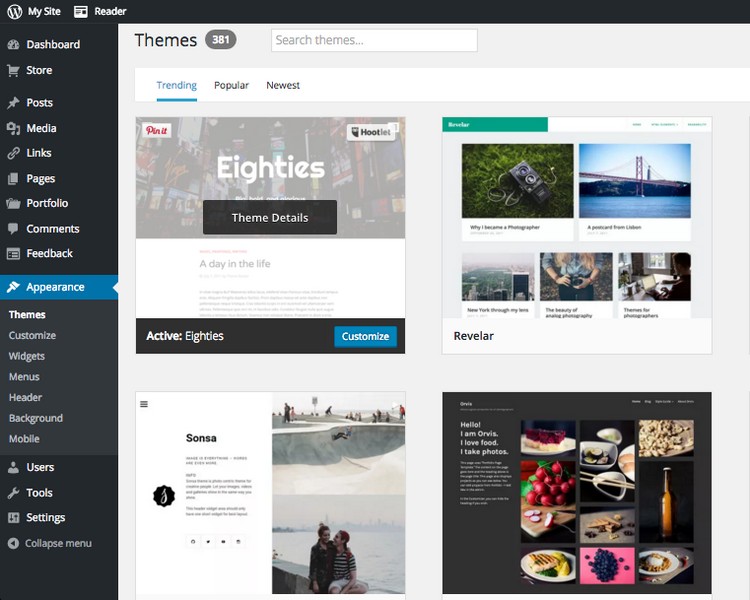
Once you’ve done with installing WordPress, you will see a clean site, and this is the point where you should opt for a theme of your own by following my guide below:
- Go to your dashboard (the wp-admin, to be specific);
- Look for “Appearance” in the sidebar, choose “Themes”;At this point, you have already got access to thousands of free themes! You may either use keywords or filter to choose one free theme that best suits your site, or you can go to ThemeForest (home to more than 20,000 themes at various costs) to buy a theme and have it set up by the producer.Remember, whether it’s free or not, you must go for a theme that is fully responsive so that your website can look stunning on any handheld devices.
- Install the new theme!
When you have decided on a theme, installing it by clicking “Activate”.
5. Add Content/Create Pages
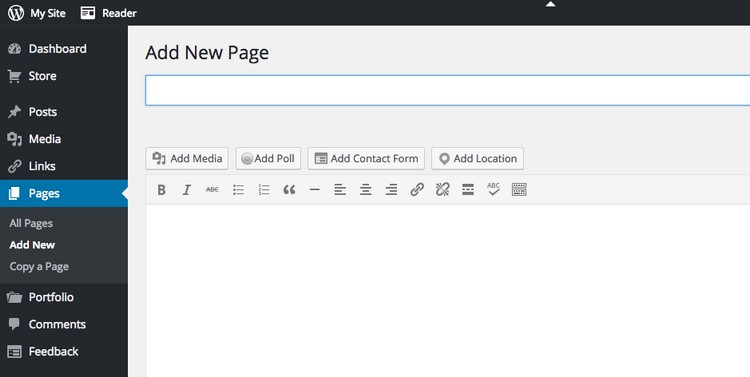
After selecting a theme for your own, what you need to do next is to construct your website with the most basic elements, which is creating pages and adding/editing posts.
To create a new page like “About Me”, simply do as follows:
- Look for “Pages” in the sidebar, choose “Add New”;
- Add text, pictures or anything you would like to in order to create a page of your own will.
Now let’s talk about posts, which are much more important if you run a blog on your website. To add a new post, what you need to do is going to “Posts”, select “Add New” and write a post! You can use categories to group similar posts by:
- Create a new category by going to “Posts”, choose “Categories”;
Or:
- Go to “Posts”, choose “Add New” and add the category to your post after finishing it already.
6. Customize Your Site
There are tons of things to talk about when it comes to customizing a website. Therefore, in this step I will only guide you to the most fundamental things you should carry out for the sake of your website, including:
- Changing the Page Titles and Tagline
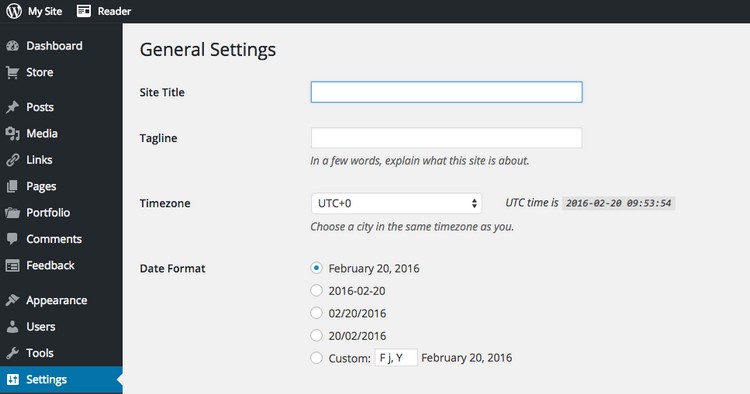
Page titles and tagline are two vital components of a website. While page titles give searchers the basic ideas about your website and determine how search engines rank your website, taglines are what added at the end of titles.To make changes to those two, all you need to do is to go to “Settings”, click “General” and change them. - Setting up a Static Front Page
Unless you want your website to appear as a blog (with the newest post showing up at the top), then you may want a static front page, which shows the same thing every time someone comes to the site.- Go to “Settings”, choose “Reading”;
– Select a static page you have created. (“Front page” is your website’s homepage while “Posts page” is the front page of your blog.) - Adjusting Sidebar
In order to add items or erase out those you do not need, here’s how:- Go to “Appearance”, select “Widgets”;
– Use the drag and drop feature to add or remove items;
7. Installing Plugins

In case you’re still wondering what those are, well, “plugins” can be understood as extensions created with the aim of broadening WordPress’ capabilities, complementing features and functions WordPress do not have. With plugins, you can do almost anything such as adding photo galleries, adding submission forms, building an online shop, etc.
As regards how to install plugins, simply go tot “Plugins”, choose “Add New” and start browsing around among over 25,000 free plugins. Installing them is easy as a piece of cake because all you need to do is to click “Install”.
If you’re at a loss as what to install, I suggest going for Contact Form 7 and Yoast SEO for WordPress as most webmasters use these two.
8. Create a Menu and Done!
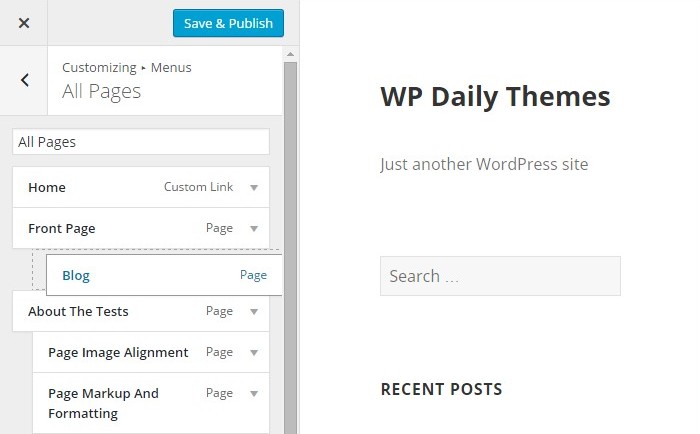
Woo-hoo! We are now at the last stage of the journey, which means your website is about to get launched! At this final step, you will create a menu so that your visitors can navigate through your website more easily.
- Make a Custom Menu
Go to “My Sites”, click Menus to create your first custom menu, you will see your “Default Menu”. Then, click on the pencil icon to give it another name if you want to. - Rearrange your Menu;
Only if you have published some pages, those pages will appear in your first menu. To organize your menu the way you want, simply drag and drop the item to where you think it should be, or do as follows:• Click on the pencil icon next to it.
• A detailed panel will appear, click on the “Move” button.
• Click “Move here” where you want to move the item.
• Choose “Move Item Above” or “Move Item Below”. - Click “Save”!
… and TADA!!! Congratulations on your brand new WordPress website!

