Modifying your theme’s existing design and functionality can be a lot of fun. You can change colors, fonts, and layouts. You can add headers, and sidebars, and so much more.
The problem is, every time you make a change to your existing theme, future updates of your theme become complicated.
Why you ask?
Well, because when you update your theme to its newest version, any modifications you made in the past will be wiped away. In order to get all of that hard work back, you will have to re-do every little change you made which can be time-consuming and no fun.
Think about it, have you tracked every piece of code you placed on your theme while you were doing it? I didn’t think so.
However, there is a solution that will allow you to make all the changes you want without fear of losing them in a future update.
Today we will look at how a child theme works, why they are important to all WordPress users, and how you can easily set one up.
How Child Themes Work
Parent themes can function on their own whereas child themes work in tandem with their parent themes.
A WordPress child theme is a theme that inherits all of its design and functionality from another theme dubbed its parent theme. This new theme then allows users to change any features of the parent theme without losing the ability to update the parent theme in the future.
Once you have activated a child theme on your website, WordPress will look to all of the files within that child theme first. If a specific file that is required for your theme to function properly does not exist within the child theme, WordPress then defaults to the parent theme for those files.
It is because of this process that modifying your theme becomes extremely easy. You simply make the small changes you want to the child theme files and leave the rest of the heavy work to the parent theme that has already been developed by someone else.
Why Use a Child Theme?
There are several reasons why all WordPress users should consider using a child theme on their website:
- If you make a coding error on your parent theme you could break your entire website, even going so far as experiencing the white screen of death.
- A child theme’s changes are never affected by a parent theme’s updates.
- You can easily and efficiently customize your website without writing an entire custom theme from scratch or having to add excessive amounts of code since both the child and parent themes work together.
- It is great practice for those who want to eventually create their own themes.
- You will have fewer security issues by keeping you parent theme updated at all times while still keeping all of your modifications.
Altogether creating and using a child theme does require some basic technical skills such as modifying PHP files, uploading new files, and modifying code, but it really is fairly simple to do once you get the hang of it.
Manually Create a Child Theme
If you want to create and modify a child theme manually you will have to have access to an FTP server such as Filezilla, and a text editor for changing some files.
Here are the steps required for creating a child theme using Filezilla:
Step 1: Create Your Child Theme’s Folder
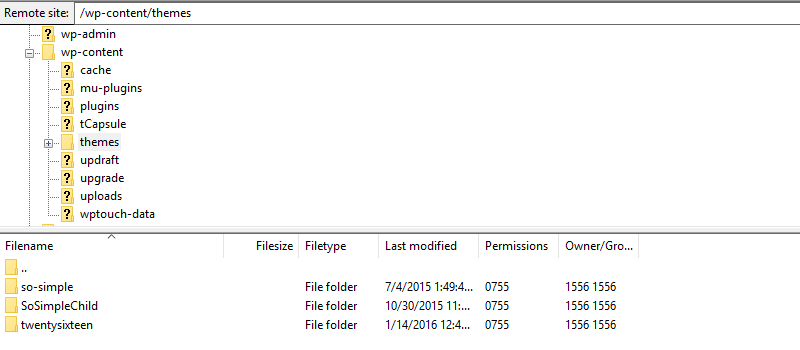
Once you are logged into your website via Filezilla (or any other FTP server you choose), navigate to the /wp-content/themes/ directory. This will contain one or more folders each representing themes that are installed on your website.

As you can see I have three folders: WordPress’ default Twenty Sixteen, my own So Simple Theme, and a child theme for So Simple. For the purposes of this tutorial I will be using the theme Twenty Sixteen as a reference point.
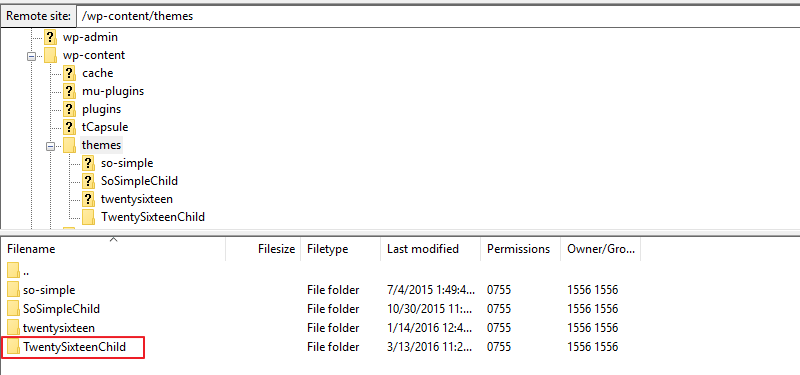
Once you are in the correct directory, create a new folder and name it whatever you like. It is recommended you use a descriptive name associating it with the parent theme. For instance I will name my new folder ‘TwentySixteenChild’.

Step 2: Create Your Child Theme’s style.css File
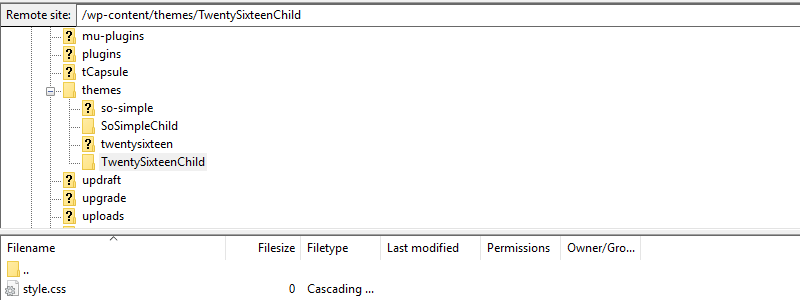
Once you have created your child theme folder, you need to add the one file that is required to create a working child theme: the style.css file. This can be thought of as the place where you will make all of your custom changes later on.

Step 3: Modify Your Child Theme’s File Structure
Next you will need to use a text editor to add some essential information to the file so that your website knows it is a working child theme and pulls from it appropriately.
You will need to paste the following code into your style.css file:

It is only necessary that you edit the Theme Name, Template, and add the @import rule line into this file to make your child theme functioning. Make sure the Template name and @import rule match your FTP server’s file names correctly as the @import rule is case sensitive.

It is important to note that if you fail to add the @import rule and activate your child theme on your website it will display a white screen. This is because this rule is what connects the parent and child themes together.
Step 4: Alternate Connection Solution of Parent and Child Themes
Though most people will add the @import rule into their child theme’s file, I think it is important to mention that it has been suggested by the WordPress Codex that this is no longer considered best practice.
Rather it is recommended that the best way to connect, or enqueue, the parent theme to the child theme is to add this code into a newly created file called functions.php:

After doing so, your themes should be connected. However, if you experience issues with your child theme’s stylesheet not loading properly, check out this detailed discussion on other ways to enqueue.
Step 5: Activate Your Child Theme
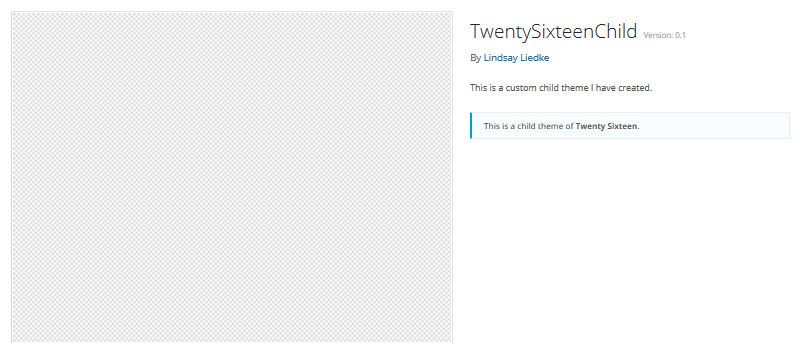
All that you have to do now is navigate to Appearance > Themes in your WordPress Dashboard and activate your newly created child theme.

Other Child Theme Creation Options
If creating a child theme using the above-mentioned steps seems too difficult for you, don’t worry. There are really easy to use plugins such as One-Click Child Theme or Child Theme Configurator that can be found in the WordPress Repository that do all of the work for you in just a few quick steps. In fact, that is actually how I personally create my child themes. It is super easy to do and there is less room for error, especially if you are new to using an FTP server.
Final Thoughts
Creating a child theme is something that all WordPress users should consider doing. It protects your website’s original theme files, allows for more flexibility when it comes to customizing the look of your website, and it is great practice for anyone interested in coding. Plus, creating one manually using an FTP client or using a WordPress plugin is easy, so there really is no excuse not to.
Have you ever created a child theme for your WordPress website? Did you use an FTP server or a plugin? I would love to hear all about it in the comments below!


Lindsay, this was a great post. I think I will go the plugin route, too. I create a lot of client sites using WordPress, and it is best to add customization via the child theme. It keeps you “update friendly” and causes less headaches. Thanks for the killer post!
Hi James!
Thank you so much for stopping by. Once I was introduced to the plugin route for creating child themes I was hooked. Sometimes the old-fashioned way can get confusing!
I am so pleased you liked the post and wish you luck on all the websites you create…I agree, way less headaches, which is always a good thing.
~ Lindsay 🙂