Although replacing a WordPress theme is simple, there are several steps you should consider to ensure a smooth transition from a theme to another.
This article is going to guide you on what are the steps required before, during, and after the replacement of the WordPress theme of your website.
Why Should You Change Your WordPress Theme?
Keeping your WordPress theme up to date is essential for running a WordPress website. Are you wondering why? Consider the following points:
- Security
The first advantage of changing your theme is that it makes your site more secure.
However, keep in mind that this only applies to WordPress themes that are too old and that haven’t received an update in at least six months.
You might lose all of your crucial data if you choose an outdated theme, which is ultimately open to cyber attacks.
So, it would be best if you change your WordPress theme to one that offers an amazing user interface along with strong security.
- Additional Features
You may be requiring some additional features to make the experience richer and easier to use. If these features are not easily available in your existing WordPress theme, then you have to change the theme to the one that has all these capabilities.
- Compatibility
WordPress is a free open-source software and it is continuously being updated.
It’s possible that the theme you installed is not compatible with the most recent version of WordPress and its plugins, which will heavily affect the functionality of your website.
This isn’t good primarily because your users won’t have a high-quality experience.
Is It Difficult to Change your WordPress Theme?
Whether changing a WordPress theme is a difficult process or not, it depends upon the type of theme you use and the procedure you follow.
Also, it highly depends on your own knowledge and help that you rely on. If you are an absolute beginner, it would be a good idea to hire a good web design service like the one offered by Brimar Online Marketing.
However, if you want to do it by yourself, keep in mind that you have to learn a couple of things before you start making changes to your website, this will prevent you from messing up your site’s functionalities.
In the best-case scenario, your new theme will only cause minor modifications to a few things, which you can easily replace or restore to their original form.
However, if your new theme requires a number of major modifications, it could be a difficult task.
With all of this in mind, the general suggestion is to pick a theme that doesn’t produce heavy modifications on your website design and interface after installing it.
Now that you understand all the risks involved, we’ll show you in 9 easy steps how to change your WordPress theme without losing content.
Let’s get started!
Step 1 – Create a Backup of Your Database
The first and most important step is to create a backup of the database of your website.
Why the database? Because it contains every post, page, and comments of your website. If you lose your database you lose all the hours and resources you have invested.
There are two methods to backup your database. The first method is to take a backup of your website data using plugins. The second method is to take a manual backup.
- Plugins
Using plugins to take backup of the website data is the easiest method. The two highly recommended plugins for taking backup of websites are BackupBuddy and UpdraftPlus.
BackupBuddy is a premium plugin which means you can only use it after purchasing it.
On the other hand, UpdraftPlus is a freemium plugin which means you get basic features for free but if you want to use advanced plugins then you have to pay. These plugins will backup plugins, themes, database and other important files of your website.
We suggest you get the premium version of these plugins because they will offer you more advanced features and they make the process easy and safe.
However, if you don’t want to use these plugins, below we will share with you a quick tutorial of how to create a manual backup of your website’s database completely free.
- Manual Backup
A manual backup needs a little more technical knowledge, but we’ll guide you through the process:
- Log in to the control panel (cpanel) of your website.
- Locate phpMyAdmin which is mostly present in the Settings section or you can type phpMyAdmin into the search box to locate it.

- Click on the Export option which is available at the navigation bar on the top.

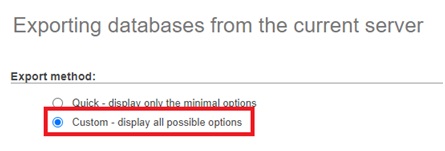
- On the export page, Quick is selected as the default export method. But we have to select the Custom option.
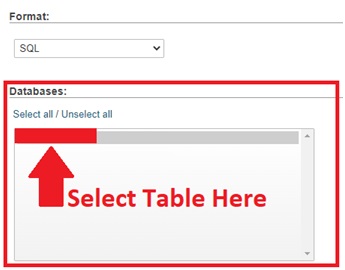
- Select the databases of your website that you want to backup.
- In the Output section, choose the gzipped option for compression.

- Finally, hit the Go button.

Step 2 – Turn On The Maintenance Mode On Your Website
You don’t want your visitors to see a non-functional website when you are performing some modifications to it. We always recommend turning on the maintenance mode of your website when doing changes to the front-end and back-end.
There are many WordPress plugins that help to put a website in a maintenance mode easily. We recommend installing a plugin called WP Maintenance Mode.
Follow the steps below to learn how to install and activate this plugin.
- Log in your WordPress account and click on Plugins > Add New.

- Search for WP Maintenance Mode in the search bar at the Plugins page.

- Click on the Install Now button.
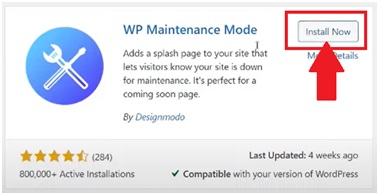
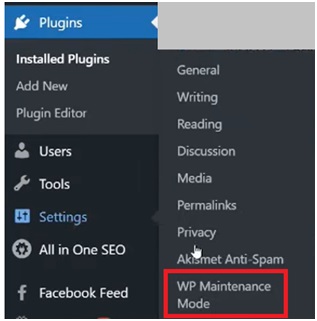
- After that click on Plugins, then click on Installed Plugins and finally click on WP Maintenance Mode.
- Here, click on Activated to change the status into maintenance mode. After that select Yes for Bypass for Search Bots.
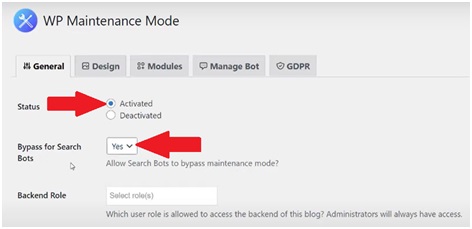
- Finally click on Save Settings button to put your website in the maintenance mode.

Step 3 – Install a New Theme
In this section we’ll show you how to install a new theme in your WordPress website.
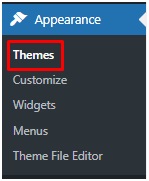
- Login into your WordPress account and click on Appearance > Themes
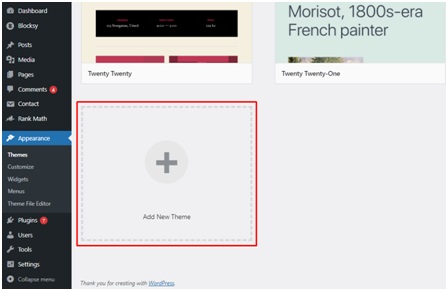
- Click on Add New Theme
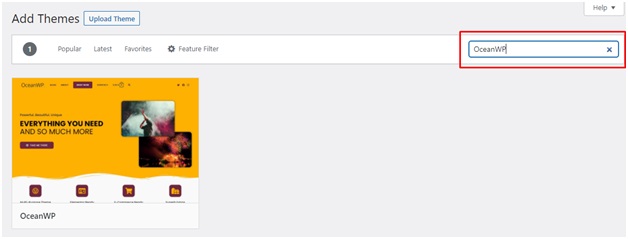
- Search for the theme that you want to install. In this case we will install “OceanWP”.
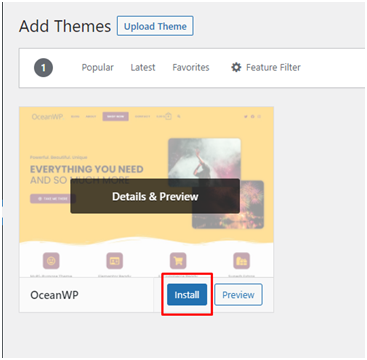
- Now click on Install
- Now click on Activate
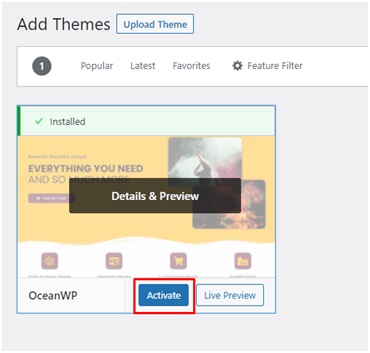
That’s it! Now it is time for you to test the functionalities of your website to make sure that everything is working properly.
Step 4 – Test Functionality And Plugins
This step is essential. Now you will have to go through your website and test everything you can. Click on menus, posts, related posts, links, comments and more.
The idea is to make sure that everything is working properly before disabling the maintenance mode.
While testing, make sure that the following things are working properly:
- Search function
- Menu
- Comments
- Widgets
- Sidebars
- Fonts
- Links
- Featured images
Step 5 – Remove Unnecessary Plugins
During the installation of the new WordPress theme, you may discover several plugins that you won’t need anymore since the theme that you’ve installed has those functionalities by default.
Plugins that aren’t being used might cause your website to slow down. Therefore, we recommend deleting those that aren’t necessary.
Step 6 – Update Ads
If your website has any third-party ads, then you have to make sure that they are shown properly after installing the new theme.
Also make sure these ads are styled symmetrically with your new theme. Check links, fonts, and the location where these ads are displayed.
Step 7 – (Optional) Add The Google Analytics Tracking Code Again
Usually website owners paste the Google Analytics code of their website into a file named header.php in WordPress.
This code is important for your website to be tracked by Google Analytics.
However, sometimes, while changing the WordPress theme of your website, the Google Analytics code is removed and it is not present in the new theme which means your website will no longer be tracked by Google Analytics.
To avoid this, make sure that your Google Analytics tracking code is inserted in your header.php file after installing the new theme. If it is not inserted, just add it again.
To access this file just go to Appearance > Theme File Editor > Theme Header or header.php.
Step 8 – Disable The Maintenance Mode
Now that you have made sure that everything is working as expected, you have to disable the maintenance mode of your website in order to make the changes visible for all your visitors.
To do this just revert the changes applied in the WordPress maintenance mode plugin explained in the step 2.
Step 9 – Ask Your Website Visitors
When frequent visitors of your website view your new theme and design, they’ll notice that you’ve changed your website’s appearance. They can help you to check if anything is missing or if there is any flaw.
Also make sure to write a brief blog article introducing your new theme and asking your website visitors. This way they will be aware of the changes and how they can help you.
Your followers would be happy to help you in making your website a success. This is a good idea. So, go ahead and ask them for their feedback.
Final Words
After you’ve taken the measures to prepare and safeguard your website, changing your theme isn’t overwhelming or dangerous.
We can say that the most important things are to always make sure to backup your website and to perform an intense review of your website’s functionalities after the modifications to ensure that everything is working properly.

