WooCommerce is one of the best known open source e- commerce plugin for WordPress. It is a wonderfully designed and popular plugin, a handy helpline from small to large-scale online merchants who use WordPress.
WooCommerce and WooThemes were recently acquired by Automattic.
Developed by Mike Jolley and Jay Koster, WooCommerce was launched way back on September 27, 2011, the plugin gained popularity because of its simplicity, easy installation, and user friendliness.
As per statistics is concerned, WooCommerce leads the race as the most used e-commerce solution in the world with 6 million downloads. WooCommerce has been adopted by over 380,000 online retailers and some big names among them are Internet System Consortium and Small Press Expo.
Managing coupons with WooCommerce
With multiple features and functions that come with WooCommerce tool- kit, Coupons are one of the best tools for making customers visit your website time and again. For offers and rewards for customers, WooCommerce’s coupon management utility is just mind blowing.
With the help of this blog, I would like to help with the efficient handling of various discount coupons which are being made available with product purchases.

- Activating coupons on the WooCommerce e – store
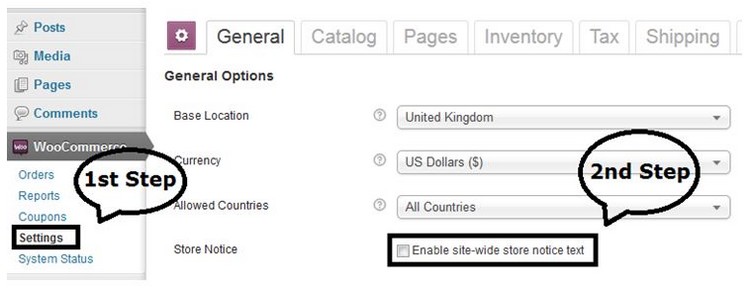
As for very first step, you simply go to the WooCommerce admin dashboard. Click on “Settings” option on left sidebar. Now, click checkout tab on the page and tick on “Enable the use of Coupons”.
- Add new coupons
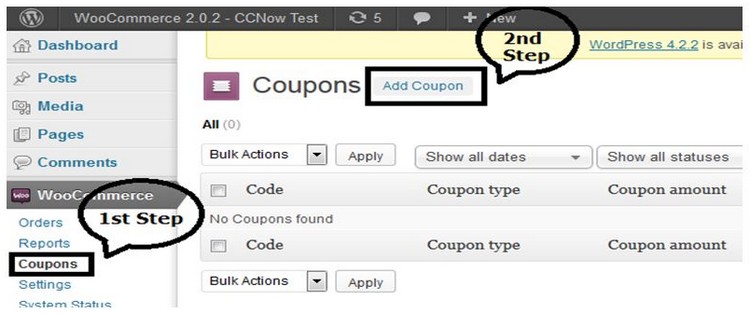
In order to add new coupons, simply scroll down with the left hand sidebar and click on “WooCommerce”. Click on “Coupons”. On the dashboard on the left hand sidebar, click “WooCommerce”, before clicking on “Coupons” from the dropdown. To create a new coupon, click “Add coupon”. Now, you can add new coupons similarly.

Here you need to enter values for the following fields:
- Coupon Code: The textbox is used to specify the code that the user would need to enter in the order to apply for the respective coupon.
- Description: Use the text –area for entering a brief description for the coupon. This information will be displayed along with the coupon.
Proceeding ahead with specifying coupon data which are being segregated as follows:
General: The general field includes:
- Discount Type: the dropdown can be used to specify discount type in relation with respective coupon. Choose the following option available.

- Cart Discount: Select the option if you want to offer a fixed total discount from the entire shopping cart.
- Cart discount %: Select the option to offer a %age discount on shopping.
- Product discount: Select to offer a discount on selected items.
- Product % discount: Select to offer a specific % discount for a chosen group of items.
- Coupon amount: Use this to enter a fixed value or percentage discount. Currency is automatically taken as dollar if not chosen.
- Allow free shipping: Select the option if you want to enable customers with free shipping.
- Apply before tax: Select the option if you want the discount coupon to be applicable on the product before tax calculation.
- Coupon expiry date: Use this to give the coupon expiry date.
- Usage restriction
- Minimum spend: Use this to set the minimum subtotal to avail the coupon.
- Individual use: Select the checkbox if you don’t want the coupon to be used with other coupons.
- Exclude sale items: Select to exclude items on sale.
- Exclude products: Select the checkbox to select products which exclude coupon facility.
- Product categories: Used to define a list of products to enable the use of a coupon.
- Exclude categories: Used to define a list of products which should not be purchased to avail coupon.
- Email restriction: Click this to specify all mail address that can avail the coupon.
Usage limit
- Usage limit per coupon: Use this to choose maximum usage limit for the coupon before it expires.
- Usage limit per person: Use this to select the maximum number of times the coupon can be used by the user.
If used properly, coupons can be used to increase visitor count on websites and also increase the sales.

