For many people, social media has become the primary source for running online marketing campaigns. But, the truth is that emails still remains the most effective marketing tool for driving traffic to a website.
In fact, Internet marketers still vouch for email marketing over social media, as the latter draws little returns despite the remarkable efforts marketers put into getting good ROI.
Let us now have a look a few statistics that will help you understand how email marketing can prove beneficial for you:
- According to email experts, spending $1 each on email marketing produces $44.25 as the average return.
- It is estimated that nearly 94 percent of consumers expect at least one form of marketing communication to be done via email (source: ExactTarget).
- Consumers spend 138 percent more than those who doesn’t receive any offers through email (source: Convince and Convert) and so on.
The above stats clearly suggest that email can help you bring more traffic to your site, and can help boost conversion. Besides, these stats, what makes email such an effective tool is the freedom it gives to users for carrying out direct communication over the web. Also, a lot of people (if not all) prefer checking their inbox more often than their social media accounts.
If the above facts have convinced you to send emails via your WordPress site, then you should consider using MailChimp to meet such need. Of course, you can choose a free-to-use email newsletter for your WordPress site, but that isn’t a reliable method and does not offer many functions like MailChimp.
Why You Opt For MailChimp Integration With WordPress?
What makes MailChimp as the best email service to be integrated with a WordPress site, because of its easy-to-use UI (user interface) that helps in creating, designing and sending emails a hassle-free task. Additionally, it helps send automated emails on the basis of customer preferences.
What’s more? It is one of the most affordable email services that allows to send emails for free until you’re sending 12000 emails to 2000 subscribers. But, in case your subscribers list grows more than 2000, you’ll need to upgrade to a paid plan.
Besides, helping you send emails, MailChimp even allows to track subscribers, provide beautiful email templates, allows setting up an RSS to your email subscriptions and more.
How Can You Integrate MailChimp To Your WordPress Site?
In order to integrate MailChimp, email service to your WordPress website, simply follow the below-mentioned steps:
Step 1 – Create Your MailChimp Account
First off, you’ll have to create a MailChimp account. To do so, access the MailChimp website and hit the “Sign Up Free” button to the extreme right at the top of the website (as shown in the image below):

This will open up the following window:
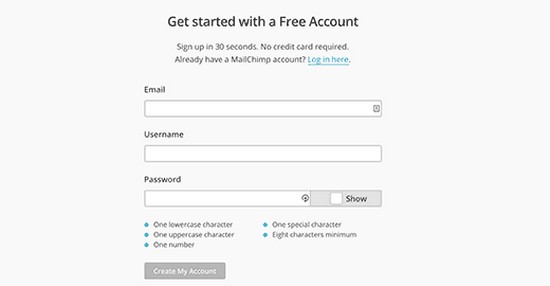
Just fill in all the details in the form to create your MailChimp account. Once you’ve successfully created your account, after logging in, you’ll be redirected to the dashboard screen of your MailChimp account.
Step 2 – Setup Your First Email List
Your next step requires creating your very first email list. For this, click on “Create a List” button from your MailChimp dashboard:

Here, you’ll be required to fill details, including your name to be displayed on your email list, an email address using which your users can reply, etc. After entering all the essential details, and then click on the “Save” button to implement all the changes you’ve made. So, that’s it! After completing this step, your first email list is ready. All you have to do is to connect that list to your WordPress website.
Step 3 – Add a Signup Form to Your WordPress Site
By default, MailChimp comes integrated with a basic subscription form. Now, to add a signup form, you’ll have to navigate to the “Lists page” in your MailChimp account. From this page, corresponding to your email list, you’ll find a downward arrow button; click on that button, and select the signup form option:
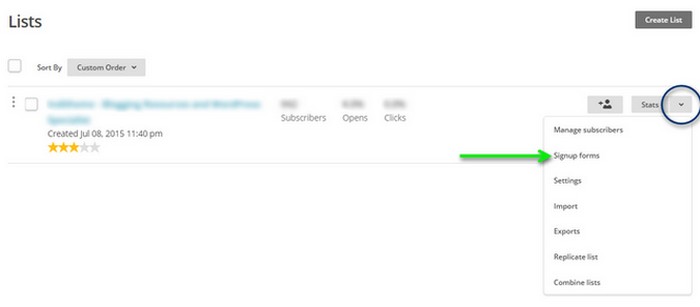
You will be redirected to a page, containing several form types. If you’ve coding expertise and would like to make some changes to your form code, then hit the “Select” button next the Embedded Forms option:
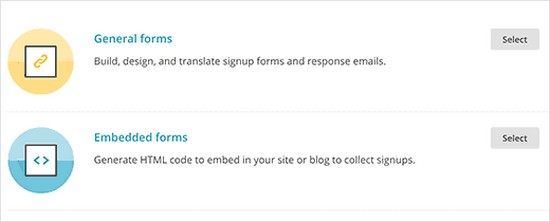
A settings page will open up, from where you’ll get to choose from three form types, namely: Classic, Super Slim, or Naked. After choosing one of these options (let’s suppose, Classic), just copy the embed code:
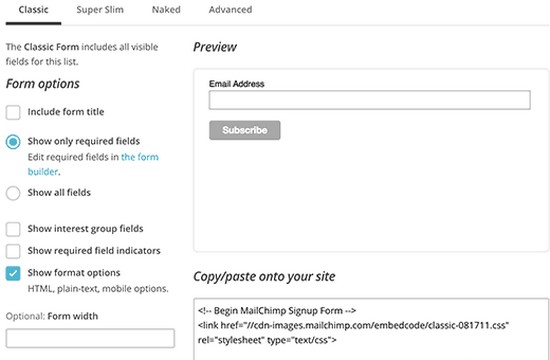
Next, visit your WordPress website admin dashboard screen. From there, go to Appearance → Widgets, and embed a ‘Text widget’ to your website sidebar. Paste the previously copied code for the signup form in that sidebar.
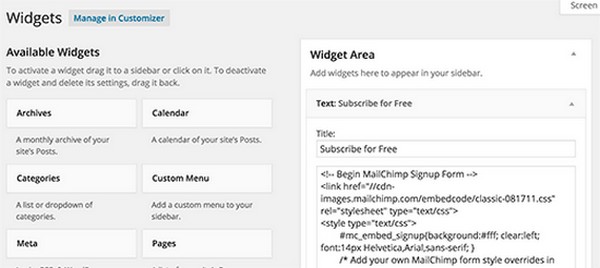
So, now your signup form is ready to use.
Final Words
If you’ve been pondering about sending emails via your WordPress site, then you must opt for the MailChimp email service. You’ll get to know about the benefits that choosing such a service provides to WordPress users, and how it can be implemented in a WordPress site.
One important thing that I would like to recommend is to use OptinMonster for building your email list if you want to create a signup form that can encourage people to subscribe to your email. OptinMonster is compatible with MailChimp and several other email marketing service providers.
Using OptinMonster, you can create many different types of engaging signup forms like slide-in forms, email forms in the form of lightbox popup, and a lot more.


Hi Calvin! Thanks for your tutorial, how to embed custom MailChimp signup forms to WordPress with better style. I agree. It looks so much better than MailChimp default templates.