Whether you’re just getting started with WordPress or have been running a web portal with the default functionality for a while, there are times when you’re in a dire need for customizing your WordPress site in your own unique way.
One of the finest areas to start with this is the WordPress admin area or the site’s backend. The best thing about WordPress is that each component of its backend can be conveniently customized with the help of simple PHP functions.
In this post, I’ll walk you through extremely simple techniques for customizing the WordPress admin area for improving the accessibility, usability and branding of WordPress enriched website.
Change the default WordPress Login URL
Unlike the default WordPress login URL i.e. /wp-admin or /wp-login.php, you can easily tweak the WordPress admin login URL to something which is more memorable. For this, you’ll have to manipulate the .htaccess file which is hidden in the root of WordPress installation.
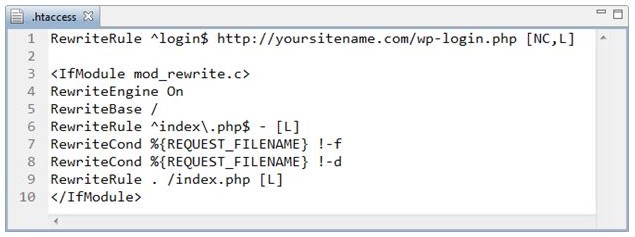
So, to start with, just check the SFTP/FTP client preferences to unleash the hidden files. After this, check the existence of the .htaccess file and if you can’t find one, create it using your preferable notepad. Just use the Notepad++ software on Windows and add the below line to it:
RewriteRule ^login$ http://yoursitename.com/wp-login.php [NC,L]
After this, replace the keyword ‘login’ with your preferred keyword and the website’s URL as shown in below screenshot:

Finally, open your preferred browser and go to http://yoursitename.com/login which will redirect you to WordPress login page.
Disable standard WordPress admin widgets
By default, WordPress contains 12 standard widgets like: Calendar(WP_Widget_Calendar), Recent Comments(WP_Widget_Recent_Comments), RSS(WP_Widget_RSS) etc. While some of the widgets will seem to be quite interesting for the admin user, others might simply turn them off.
Hence, you can easily opt for disabling the widgets which are not required for your WordPress installation. For this, you can use the widget_init action and name the function as remove_some_wp_widgets. The complete code snippet associated with this is displayed below:
function remove_some_wp_widgets(){
  unregister_widget('WP_Widget_Archives');
  unregister_widget('WP_Widget_RSS');
  unregister_widget('WP_Widget_Tag_Cloud');
}

add_action('widgets_init',remove_some_wp_widgets', 1);
Change the default external link of WordPress Login Page
On logging into WordPress, the default logos take you to WordPress.org website. You can easily change this default link to something that’s of your choice. For this, all you need to do is simply open the functions./php file and add the below lines of code to it:
// Use your own external URL logo link
function wpc_url_login(){
	return "http://yourwebsitename.com/"; // your URL here
}
add_filter('login_headerurl', 'wpc_url_login');
Once you’re done with adding the above code snippet to functions.php file, don’t forget to save it, followed by logging out to view the end result.
Change the logo for the WordPress admin area pages
As a simple trick to customize the WordPress admin area, you can go ahead with changing the logo for the login page as well as the one that’s displayed within the top left corner on different WordPress Admin area pages. Here is the code snippet which prints out the CSS which hooks into the logo’s div and has a unique ID of #header-logo within the admin pages. Also, there is a h1>- an element for the WordPress login page.
function wp_custom_logo() {
  echo '<style type="text/css">
    #header-logo { background-image: url('.get_bloginfo('template_directory').'/imgs/wp_admin_logo.png) !important; }
    </style>';
}

add_action('admin_head', 'wp_custom_logo');

function wp_login_logo() {
  echo '<style type="text/css">
    h1 a { background-image:url('.get_bloginfo('template_directory').'/imgs/wp_login_logo.png) !important; }
    </style>';
}

add_action('login_head', 'wp_login_logo');
In the above code snippet, for the URL property of style rules, you just need to feed in the image location for your custom logo. If the image that you want to use for the logo is available in the WordPress theme’s directory, then you can use get_bloginfor(‘ template_directory’) template tag for fetching the image’s relative path, followed by location of images directory.
Create a custom Admin Color Scheme
If you want to change your WordPress admin color scheme, all you need to do is simply create a new CSS stylesheet. For instance, I’ve created a new admin color scheme called wp_theme.css and placed it in the folder titled/css. That means, I’ll be editing the functions.php file by adding the below snippet to it:
// WP Admin color scheme
function wp_theme_css() {
	wp_enqueue_style( 'wp_theme_css', get_bloginfo('template_directory'). '/css/wp_theme.css' );
}
add_action('admin_print_styles', 'wp_theme_css' );
Here, do remember that the wp_theme.css file contains all styles which are compatible with WordPress.
That’s it for now!
Conclusion
Since the depth of WordPress is incredible, it’s time for you to dig deeper and explore multiple possibilities. Customizing the WordPress admin area is one such excellent step. Here’s hoping the above post would have allowed you to gather brilliant insights on customizing WordPress admin in your own unique way.

